在上一篇中我们详细介绍了Nexus中有关仓库的内容,并且也创建了我们自定义的仓库,这一篇中我们将详细介绍一下,如何部署组件到Nexus中,以及如何使用Nexus中的组件。将Maven中的组件部署到Nexus非常的简单,共有两种方式可以选择,第一种是直接通过Nexus上传,还有一种是通过Maven的命令部署。我们首先看一下第一种部署方式。
一、Nexus界面部署
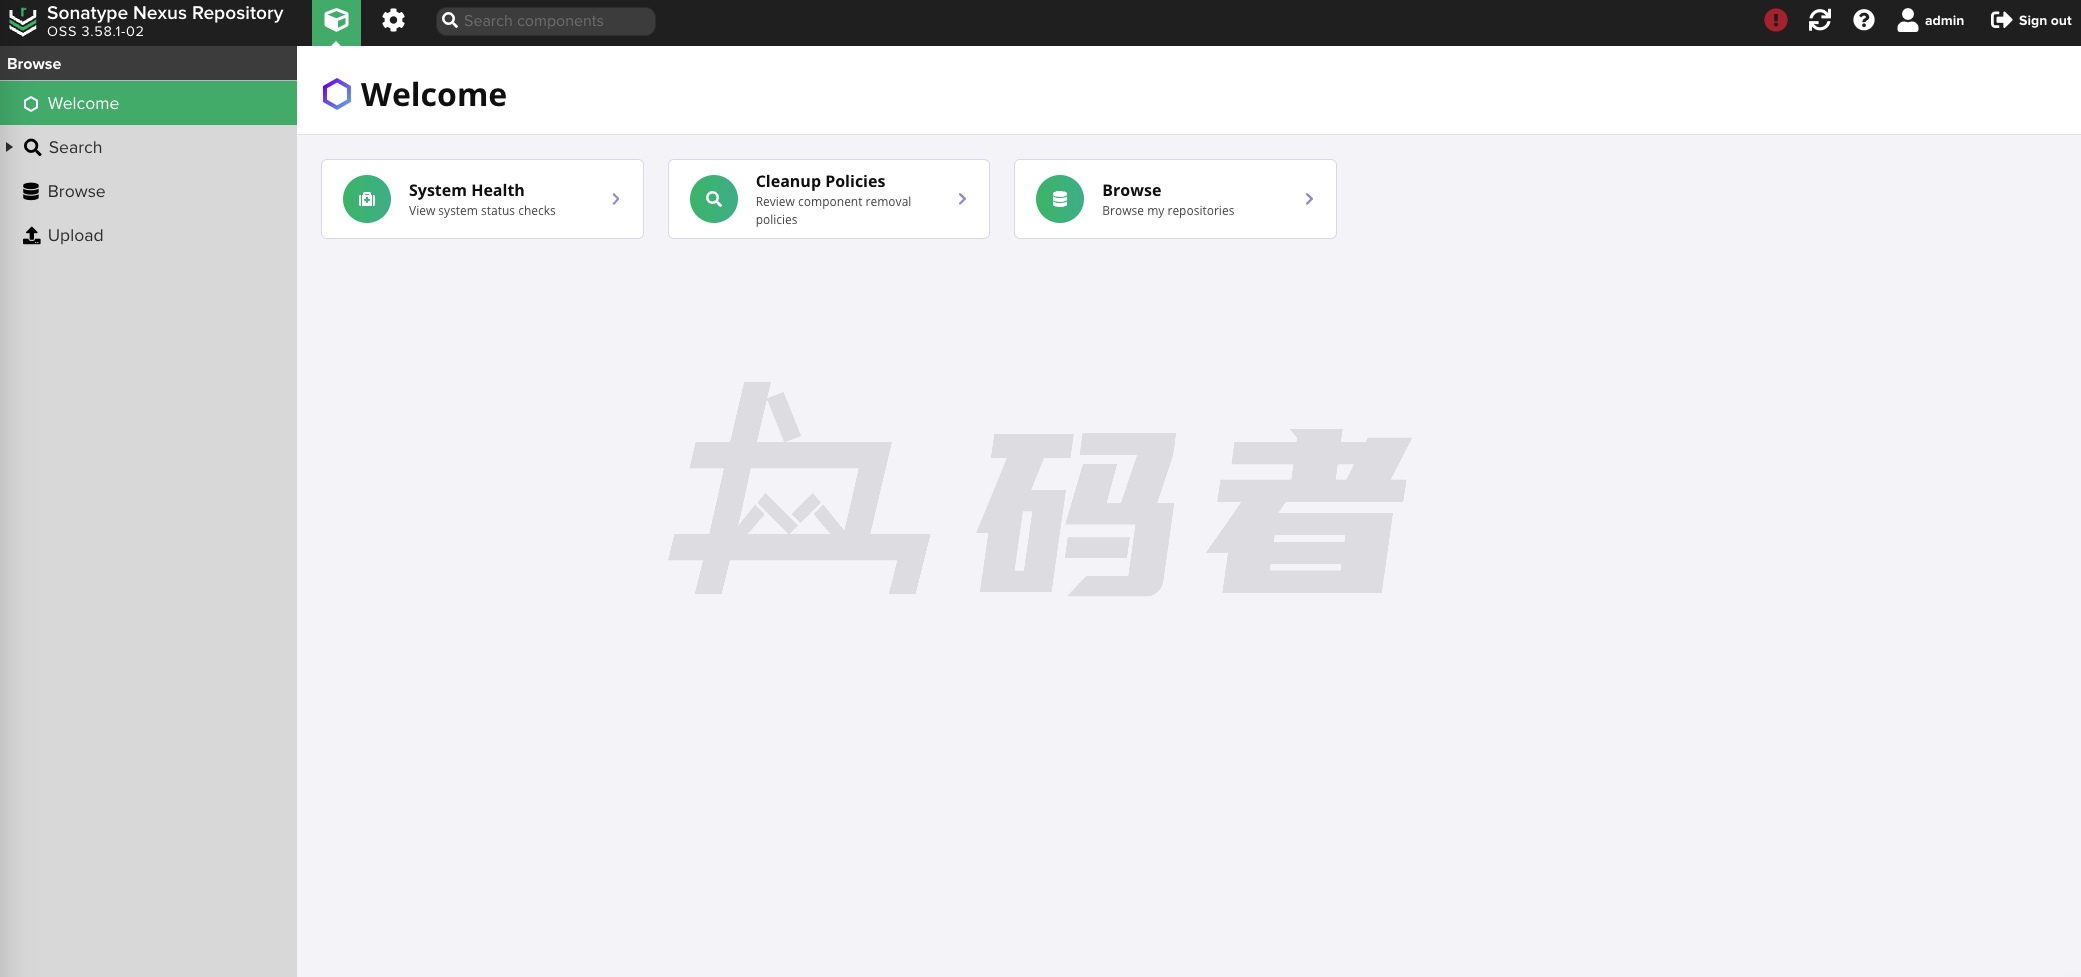
通过Nexus界面部署组件很简单,我们首先需要登陆管理员账号,然后我们点击Upload按钮。具体操作如下图所示:
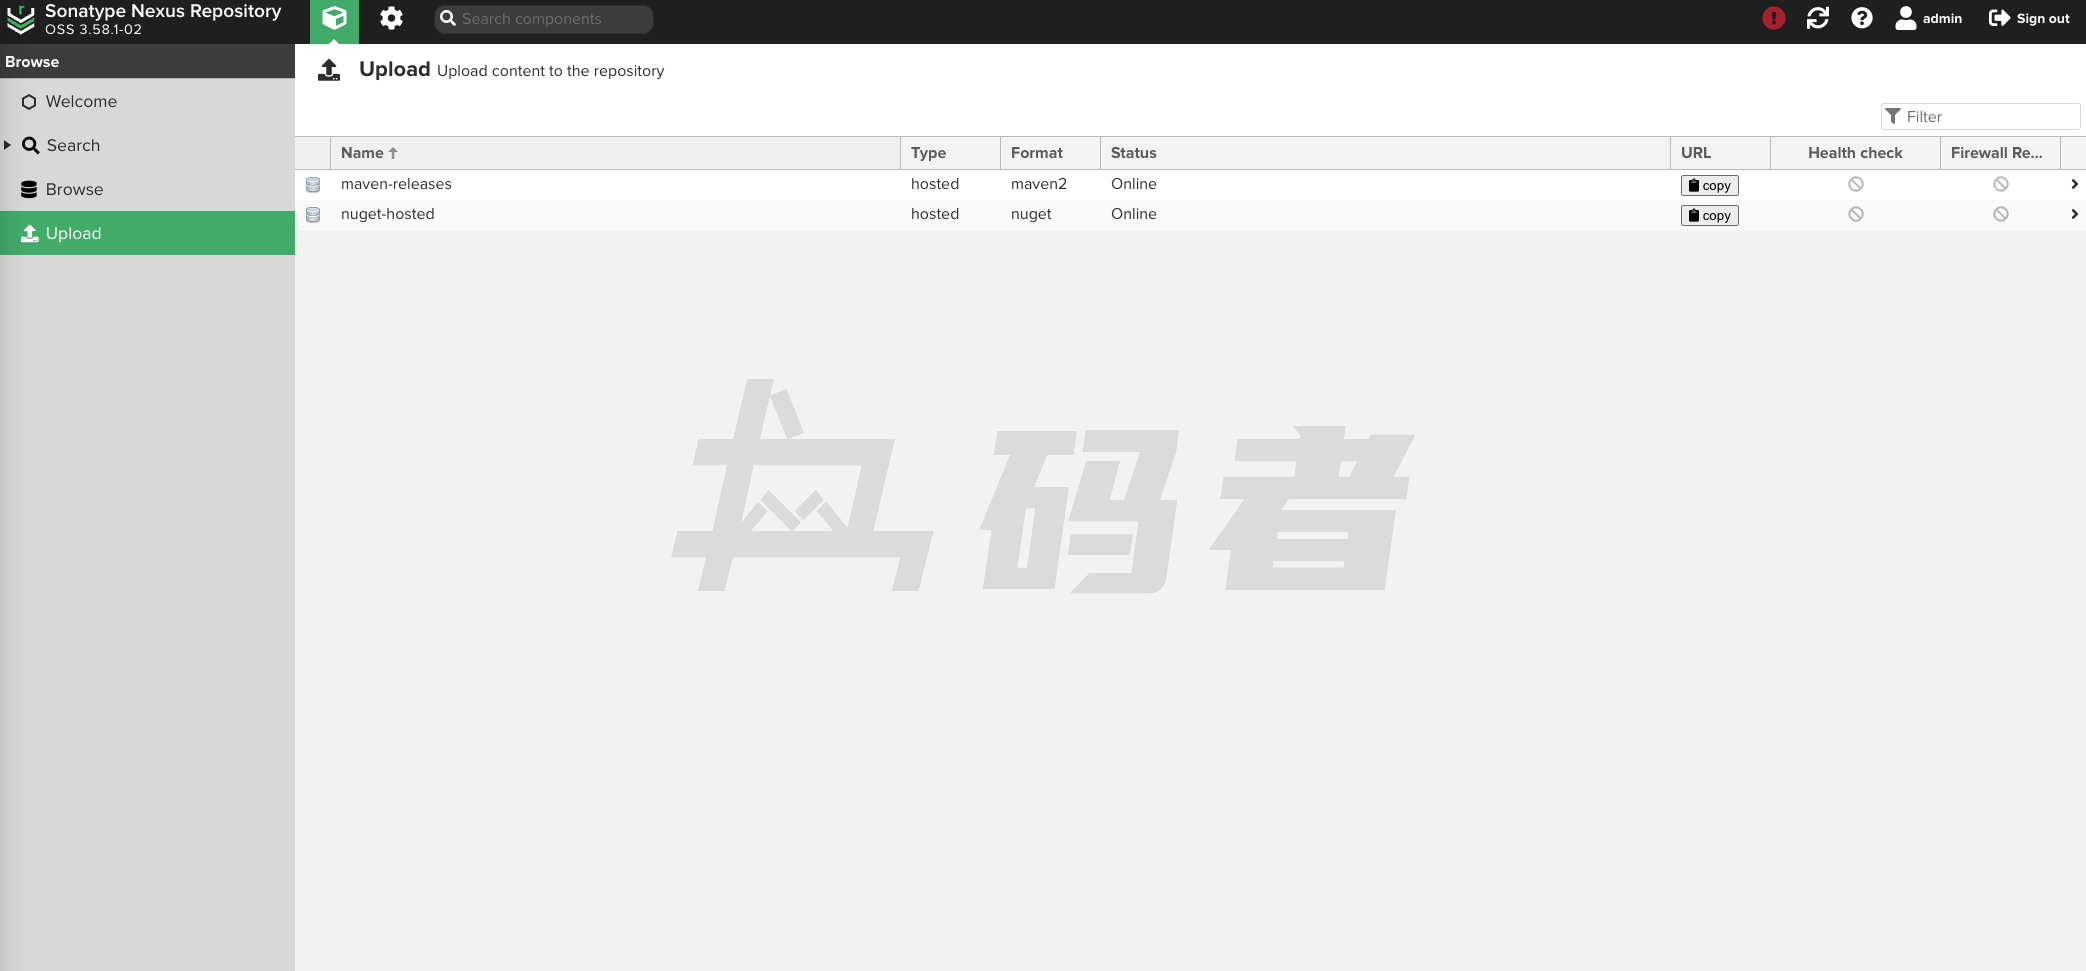
然后我们选择maven-releases。
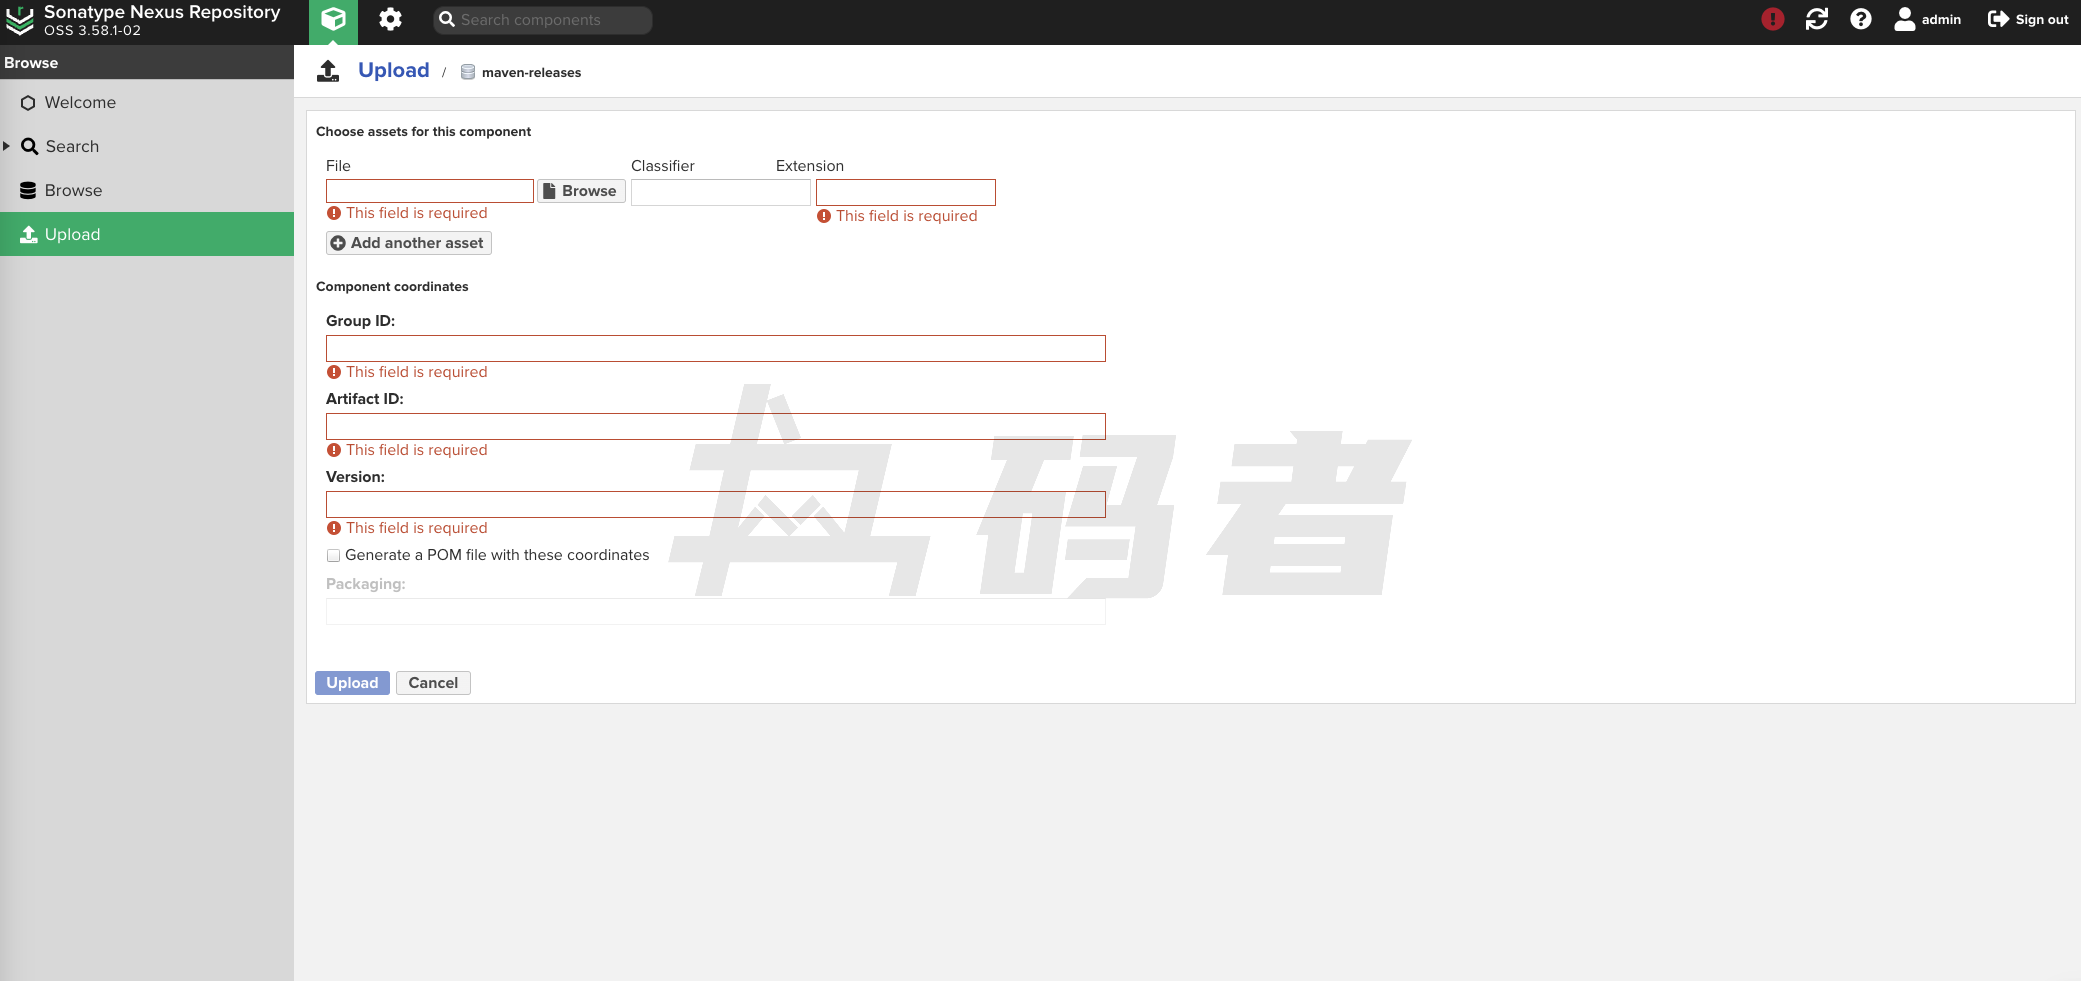
点击完成后,需要我们填写这个组件的基本信息。
由于需要我们上传一个真正的组件,所以我们还是以之前介绍的项目为例子,也就是mazhe-maven-order项目。我们首先打包一下这个项目。
- pom.xml(mazhe-maven-order)
<?xml version="1.0" encoding="UTF-8"?>
<project xmlns="http://maven.apache.org/POM/4.0.0"
         xmlns:xsi="http://www.w3.org/2001/XMLSchema-instance"
         xsi:schemaLocation="http://maven.apache.org/POM/4.0.0 http://maven.apache.org/xsd/maven-4.0.0.xsd">
    <parent>
        <artifactId>midai-mazhe-maven</artifactId>
        <groupId>cn.ma-zhe</groupId>
        <version>1.0-SNAPSHOT</version>
    </parent>
    <modelVersion>4.0.0</modelVersion>

    <artifactId>mazhe-maven-order</artifactId>
</project>- 打包
md@ershisifenqibeigenhaoliudeMac-Studio mazhe-maven-order % mvn clean package
[INFO] Scanning for projects...
[INFO]
[INFO] --------------------< cn.ma-zhe:mazhe-maven-order >---------------------
[INFO] Building mazhe-maven-order 1.0-SNAPSHOT
[INFO]   from pom.xml
[INFO] --------------------------------[ jar ]---------------------------------
[INFO]
[INFO] --- clean:3.2.0:clean (default-clean) @ mazhe-maven-order ---
[INFO] Deleting /Users/md/Desktop/midai-mazhe-maven/mazhe-maven-order/target
[INFO]
[INFO] --- resources:3.3.1:resources (default-resources) @ mazhe-maven-order ---
[WARNING] Using platform encoding (UTF-8 actually) to copy filtered resources, i.e. build is platform dependent!
[INFO] skip non existing resourceDirectory /Users/md/Desktop/midai-mazhe-maven/mazhe-maven-order/src/main/resources
[INFO]
[INFO] --- compiler:3.11.0:compile (default-compile) @ mazhe-maven-order ---
[INFO] Changes detected - recompiling the module! :source
[WARNING] File encoding has not been set, using platform encoding UTF-8, i.e. build is platform dependent!
[INFO] Compiling 1 source file with javac [debug target 1.8] to target/classes
[INFO]
[INFO] --- resources:3.3.1:testResources (default-testResources) @ mazhe-maven-order ---
[WARNING] Using platform encoding (UTF-8 actually) to copy filtered resources, i.e. build is platform dependent!
[INFO] skip non existing resourceDirectory /Users/md/Desktop/midai-mazhe-maven/mazhe-maven-order/src/test/resources
[INFO]
[INFO] --- compiler:3.11.0:testCompile (default-testCompile) @ mazhe-maven-order ---
[INFO] No sources to compile
[INFO]
[INFO] --- surefire:3.1.2:test (default-test) @ mazhe-maven-order ---
[INFO] No tests to run.
[INFO]
[INFO] --- jar:3.3.0:jar (default-jar) @ mazhe-maven-order ---
[INFO] Building jar: /Users/md/Desktop/midai-mazhe-maven/mazhe-maven-order/target/mazhe-maven-order-1.0-SNAPSHOT.jar
[INFO] ------------------------------------------------------------------------
[INFO] BUILD SUCCESS
[INFO] ------------------------------------------------------------------------
[INFO] Total time:  2.443 s
[INFO] Finished at: 2023-08-22T22:53:27+08:00
[INFO] ------------------------------------------------------------------------然后我们我们点击target目录就可以查看到我们新打包的组件了。
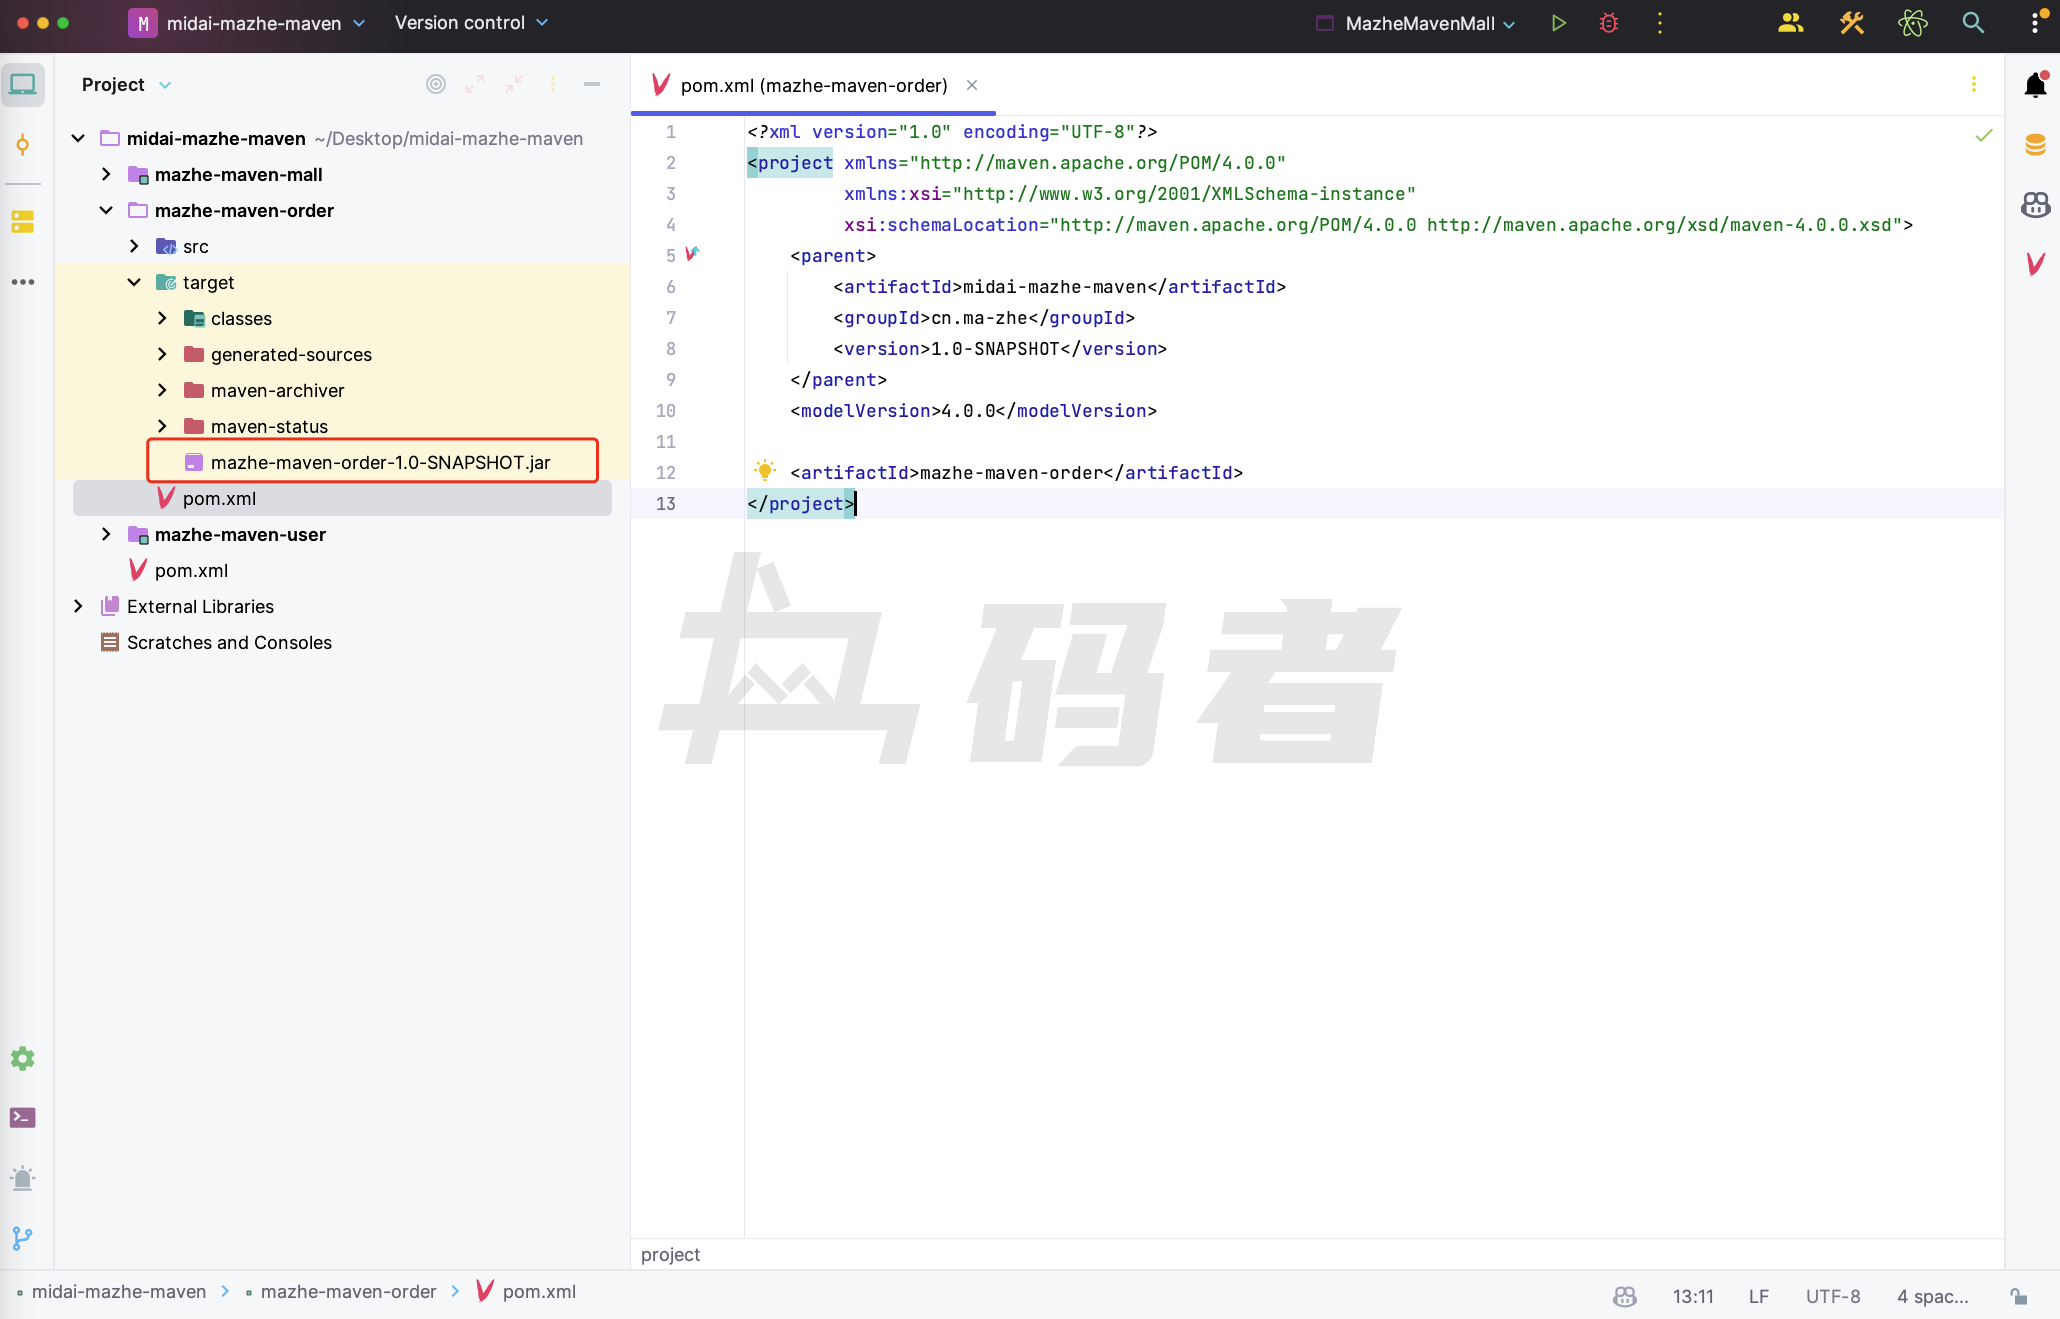
然后我们在Nexus中点击Browse按钮上传我们刚刚打包的组件。
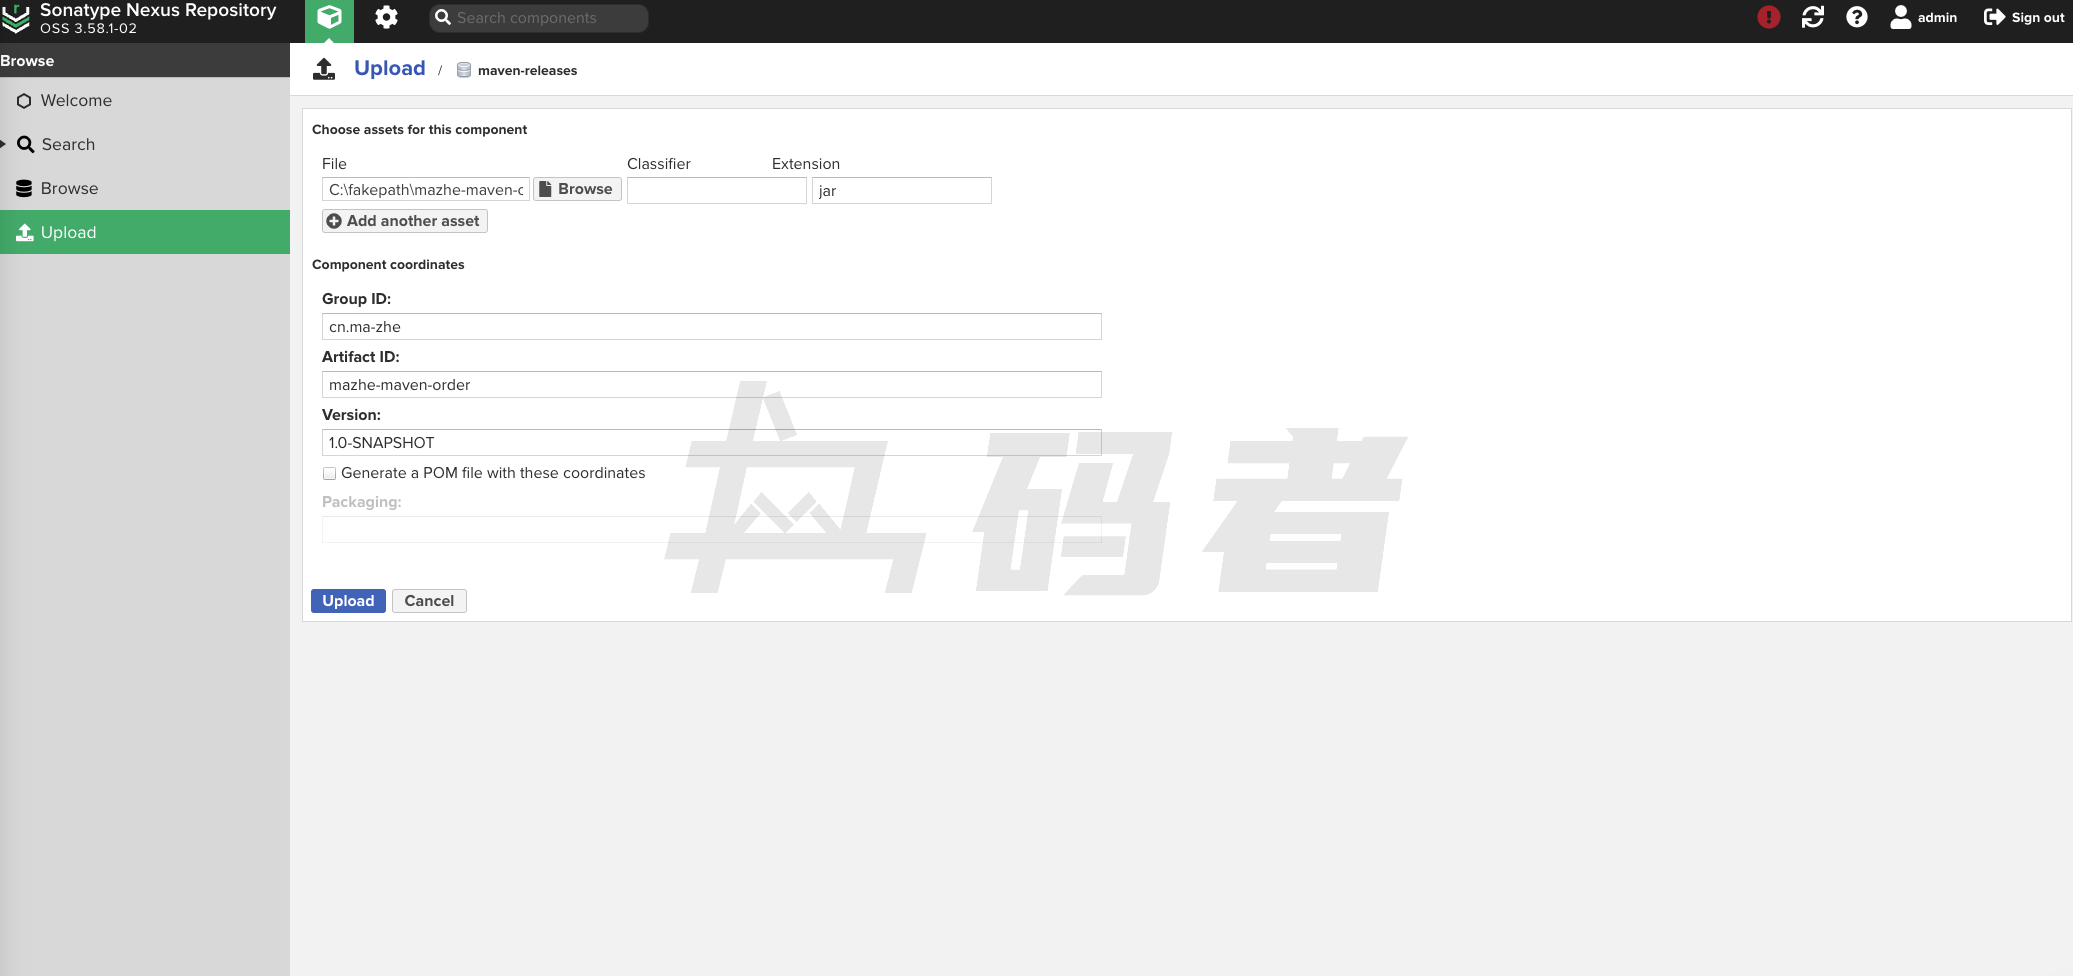
当我们填写完这些信息后,我们点击Upload按钮。
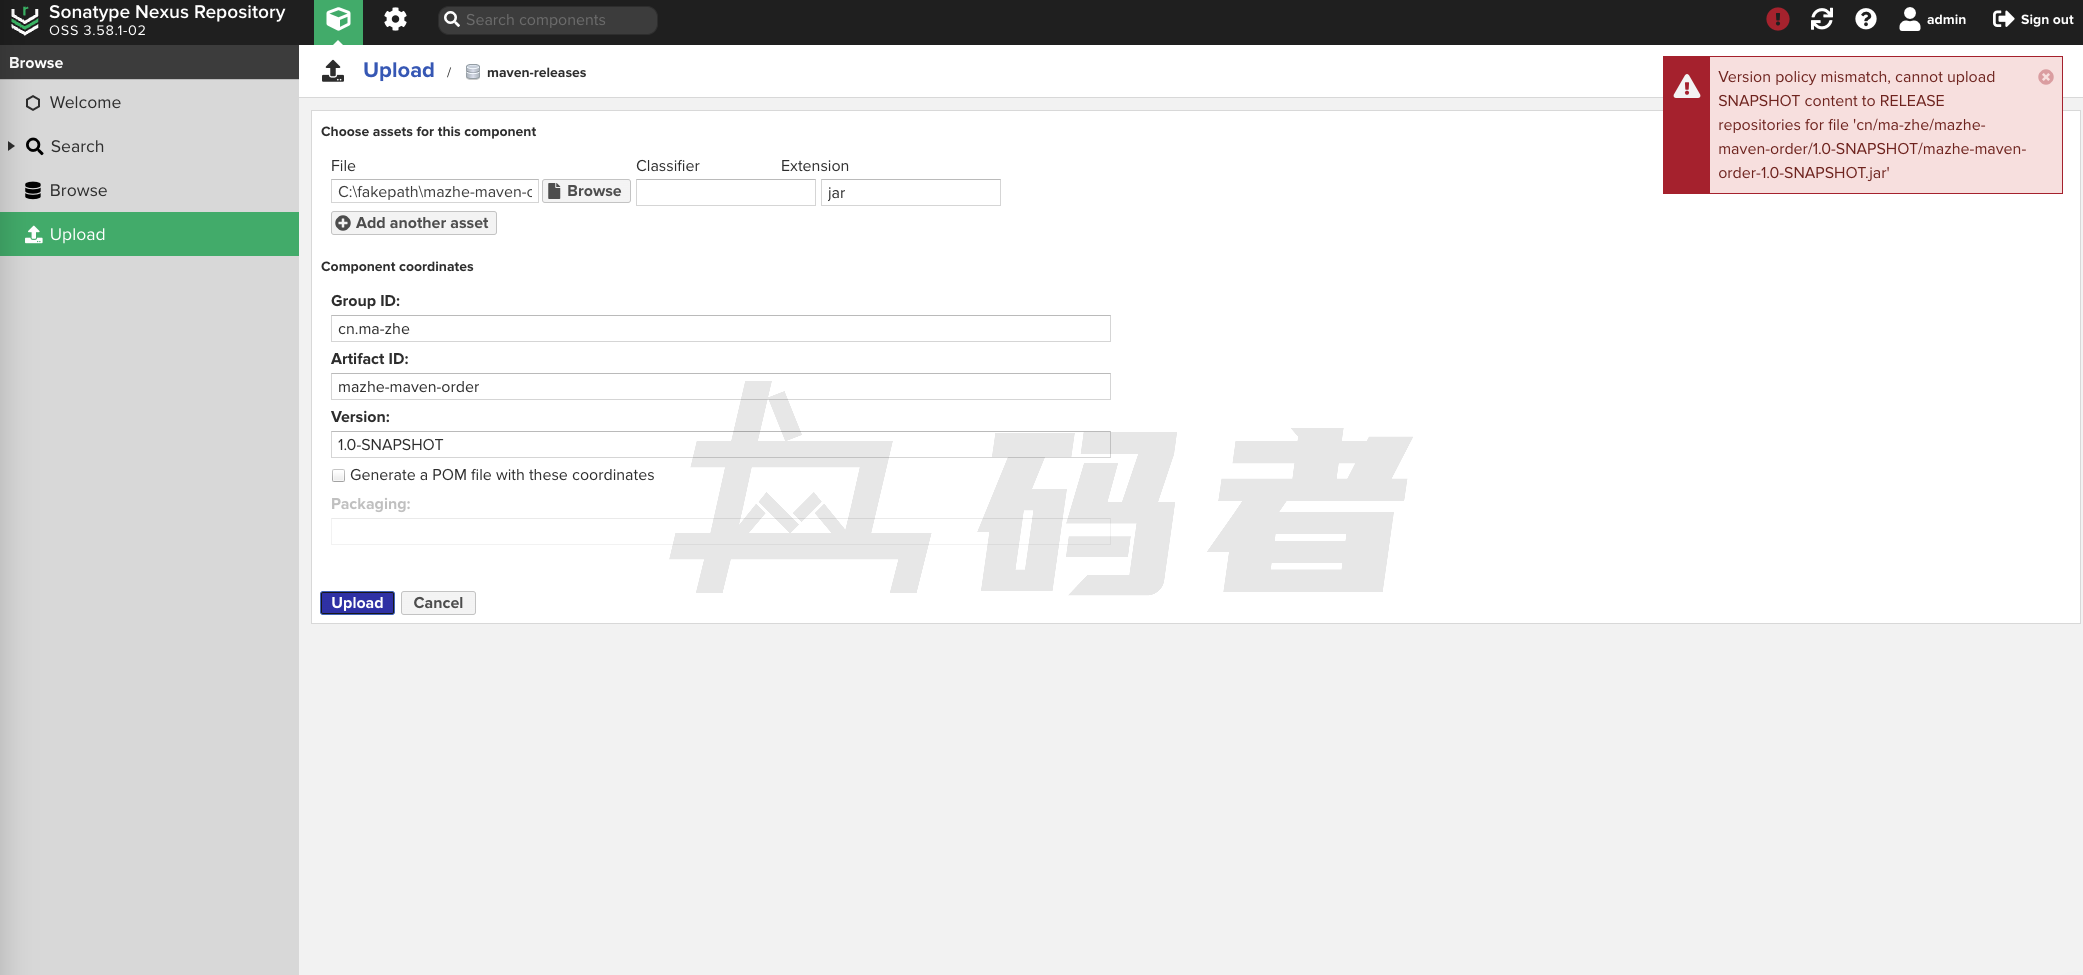
我们点击按钮后,发现Nexus居然报错了。

这是为什么呢?答案很简单,我们在上篇中介绍过,Nexus创建仓库的时候,是可以配置仓库的版本策略的。因为maven-releases仓库,只允许上传稳定版本的组件,但我们上面写的是快照版本,所以nexus拒绝了我们上传。下面我们把上面的版本信息修改为稳定版本。
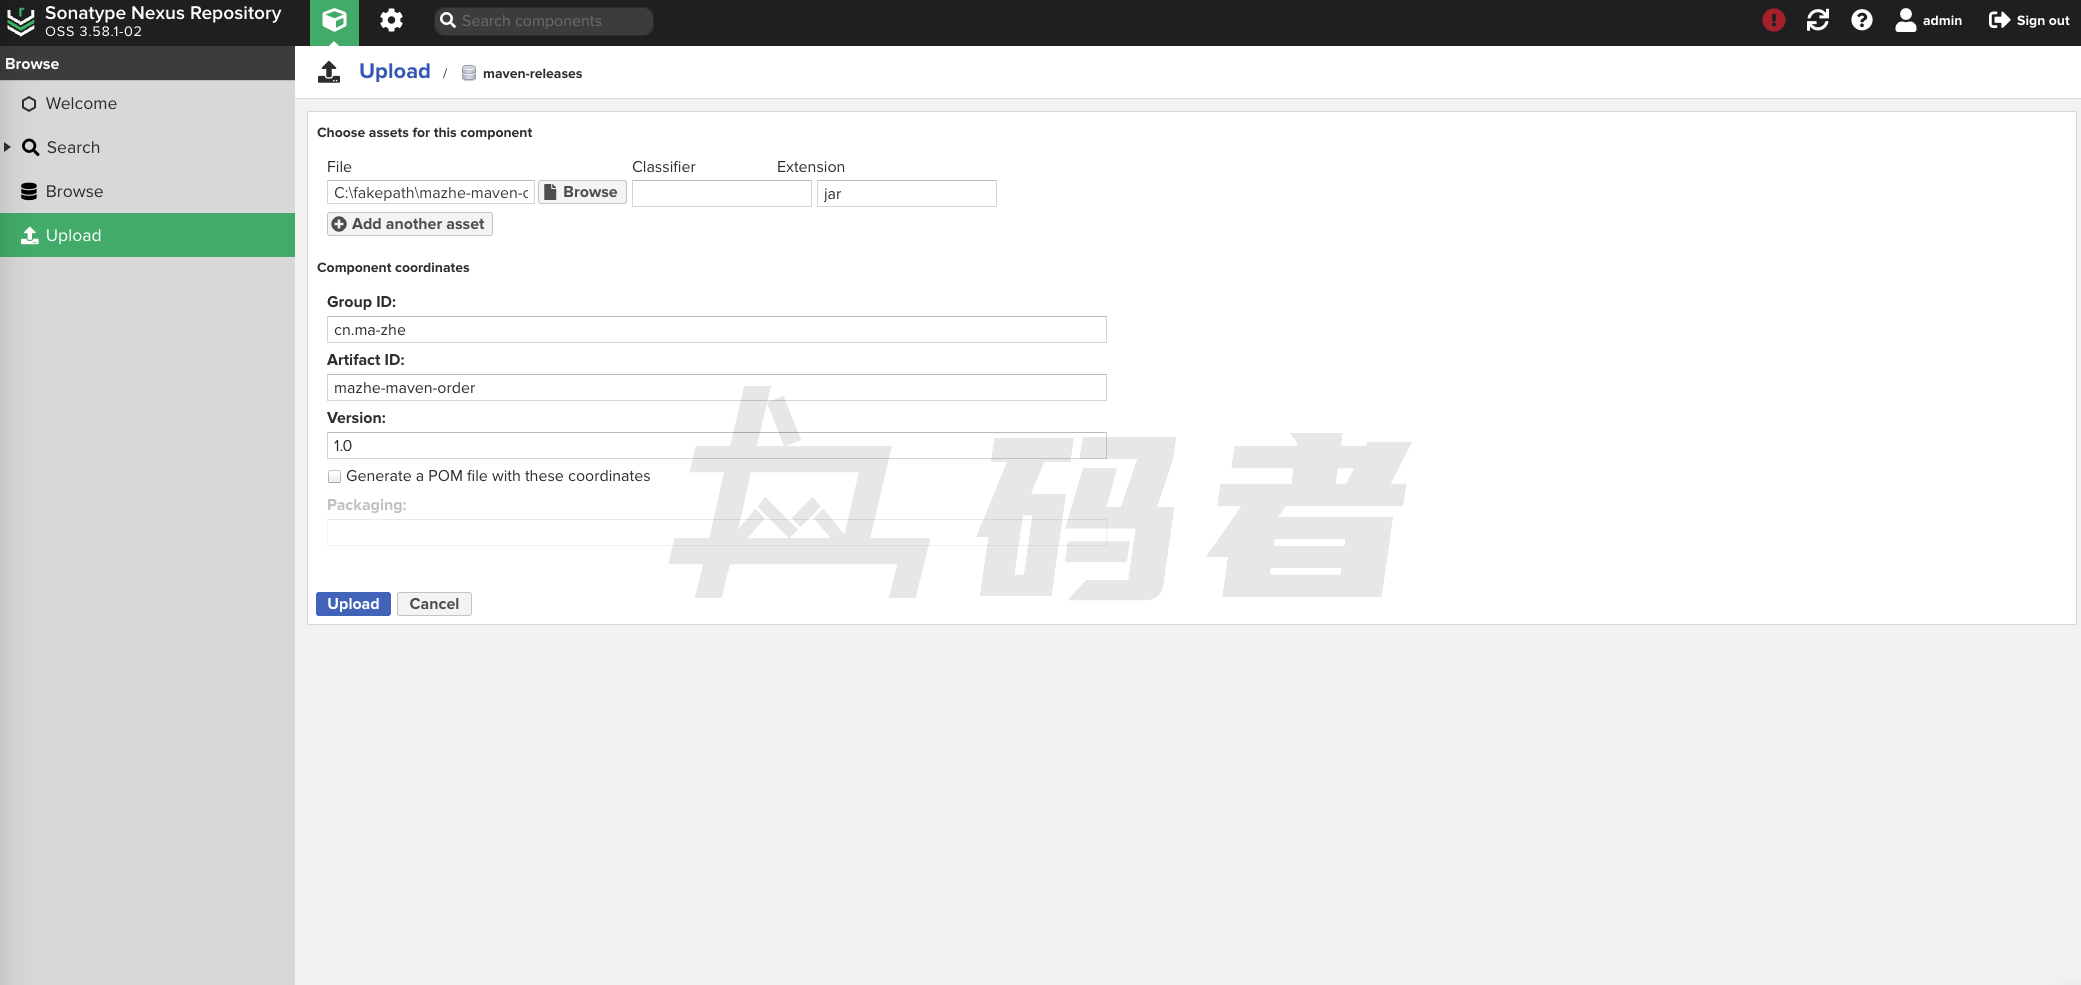
然后我们继续点击Upload上传来看一下Nexus是否还会报错。
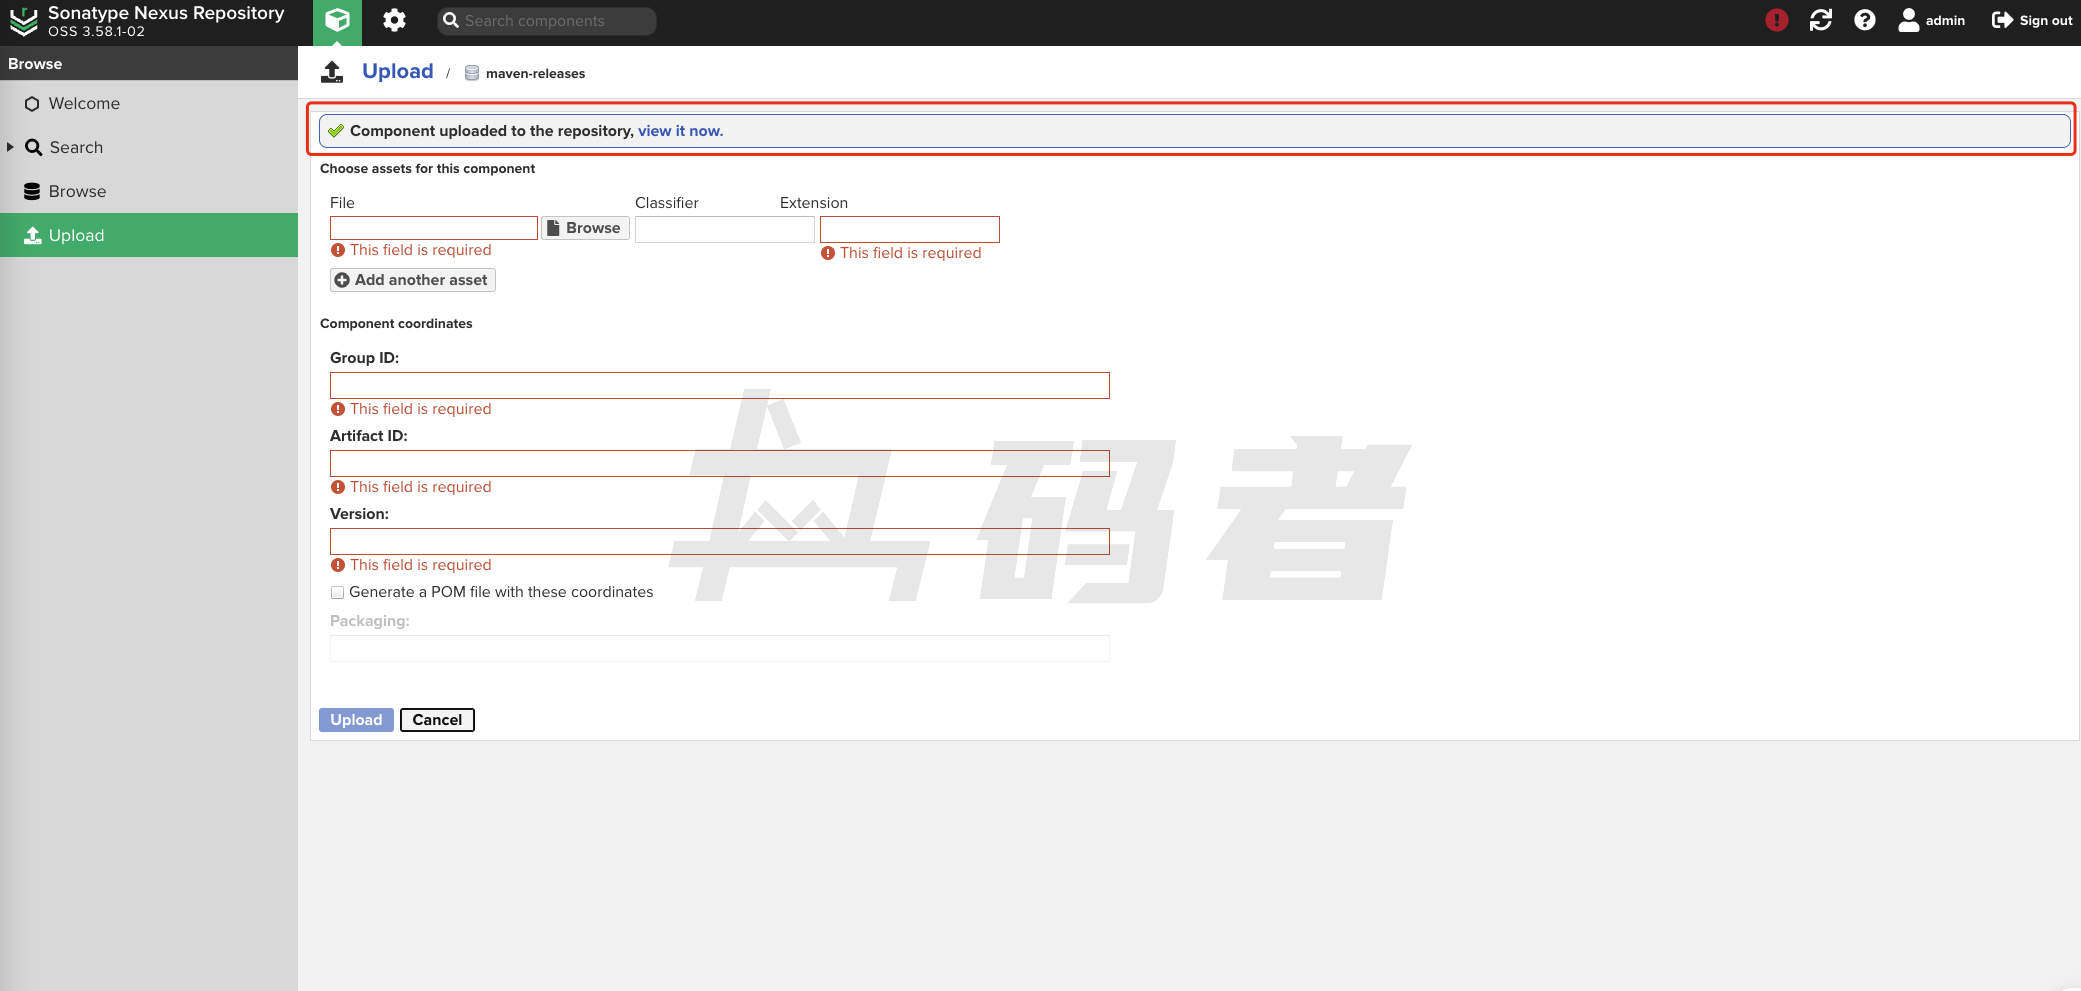
我们看这次我们上传成功了,我们点击一下上面的view it now 链接,来查看一下,我们刚刚上传的依赖。
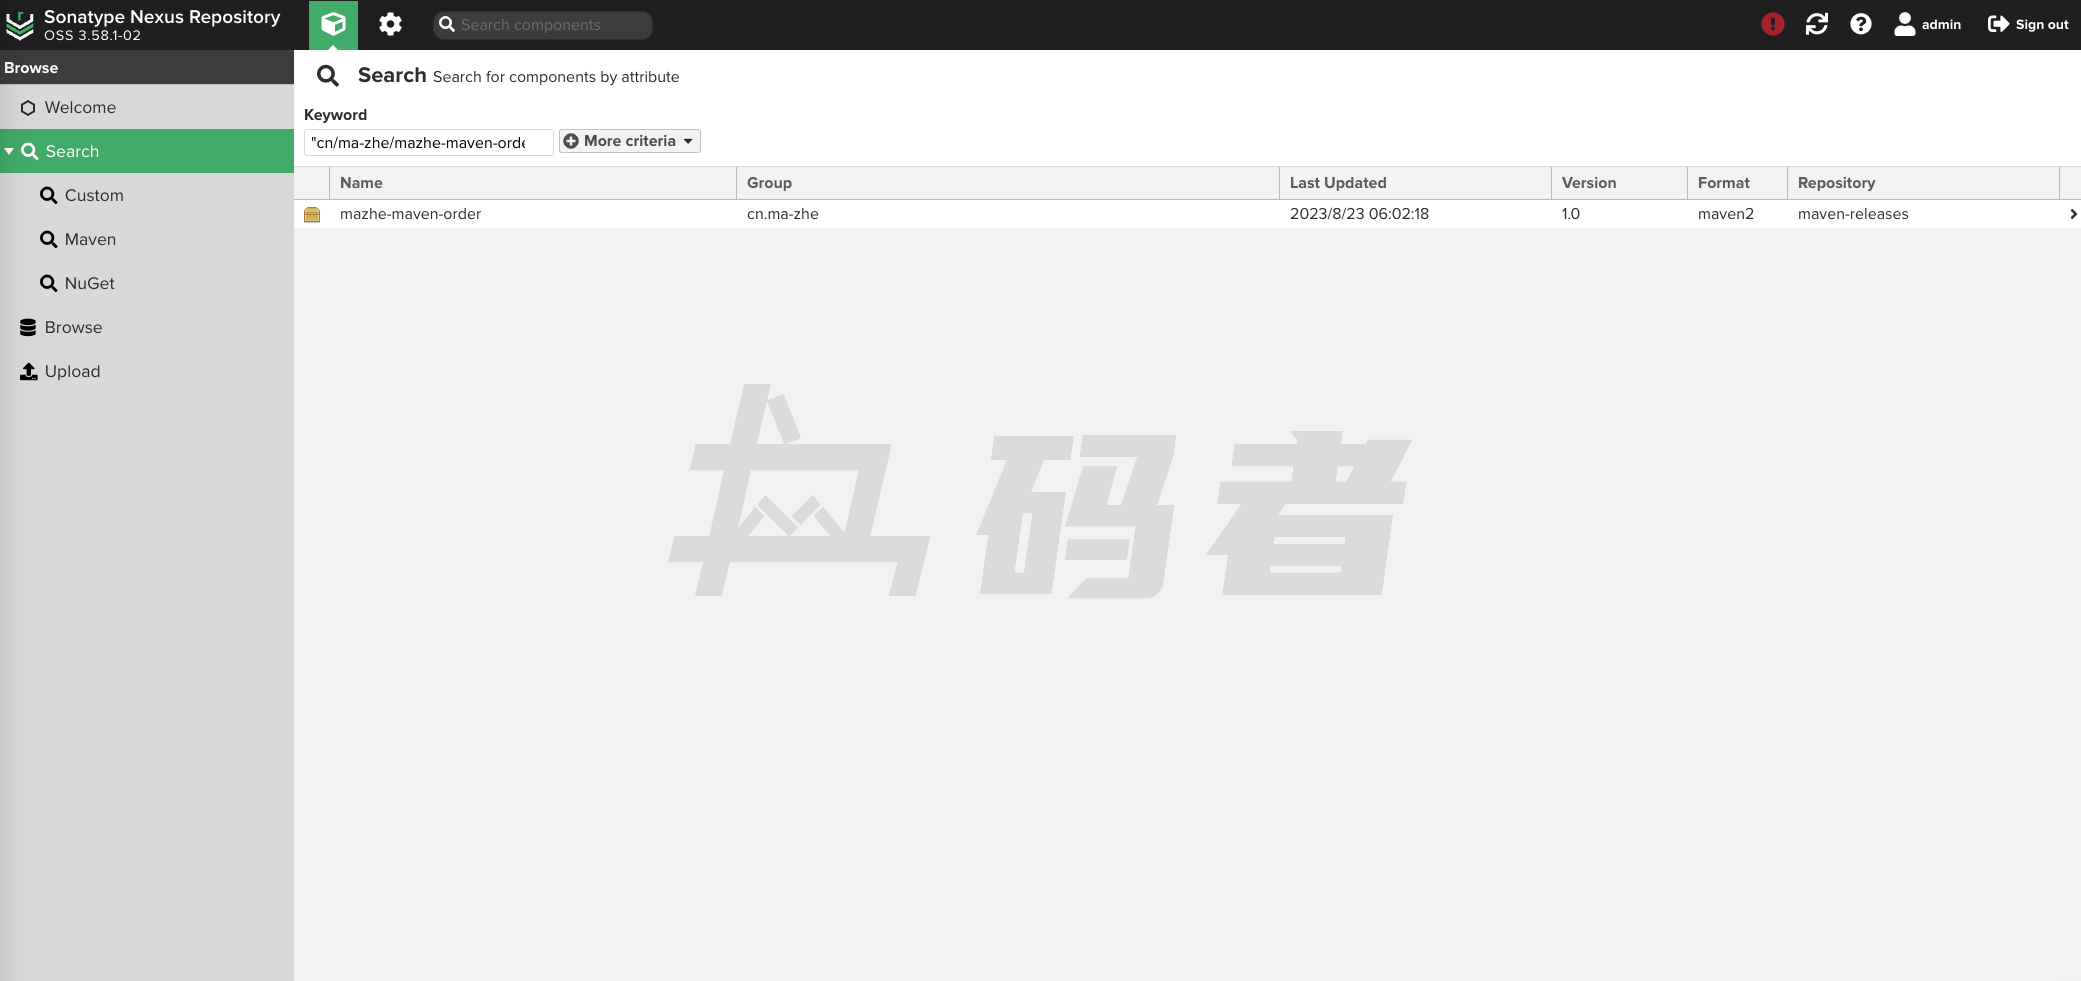
这样我们就能很方便的在Nexus中看到我们刚刚上传的依赖信息,以及上传时间了。同样的我们也可以通过我们上篇中介绍的,通过Nexus中的search搜索我们刚刚上传的依赖。
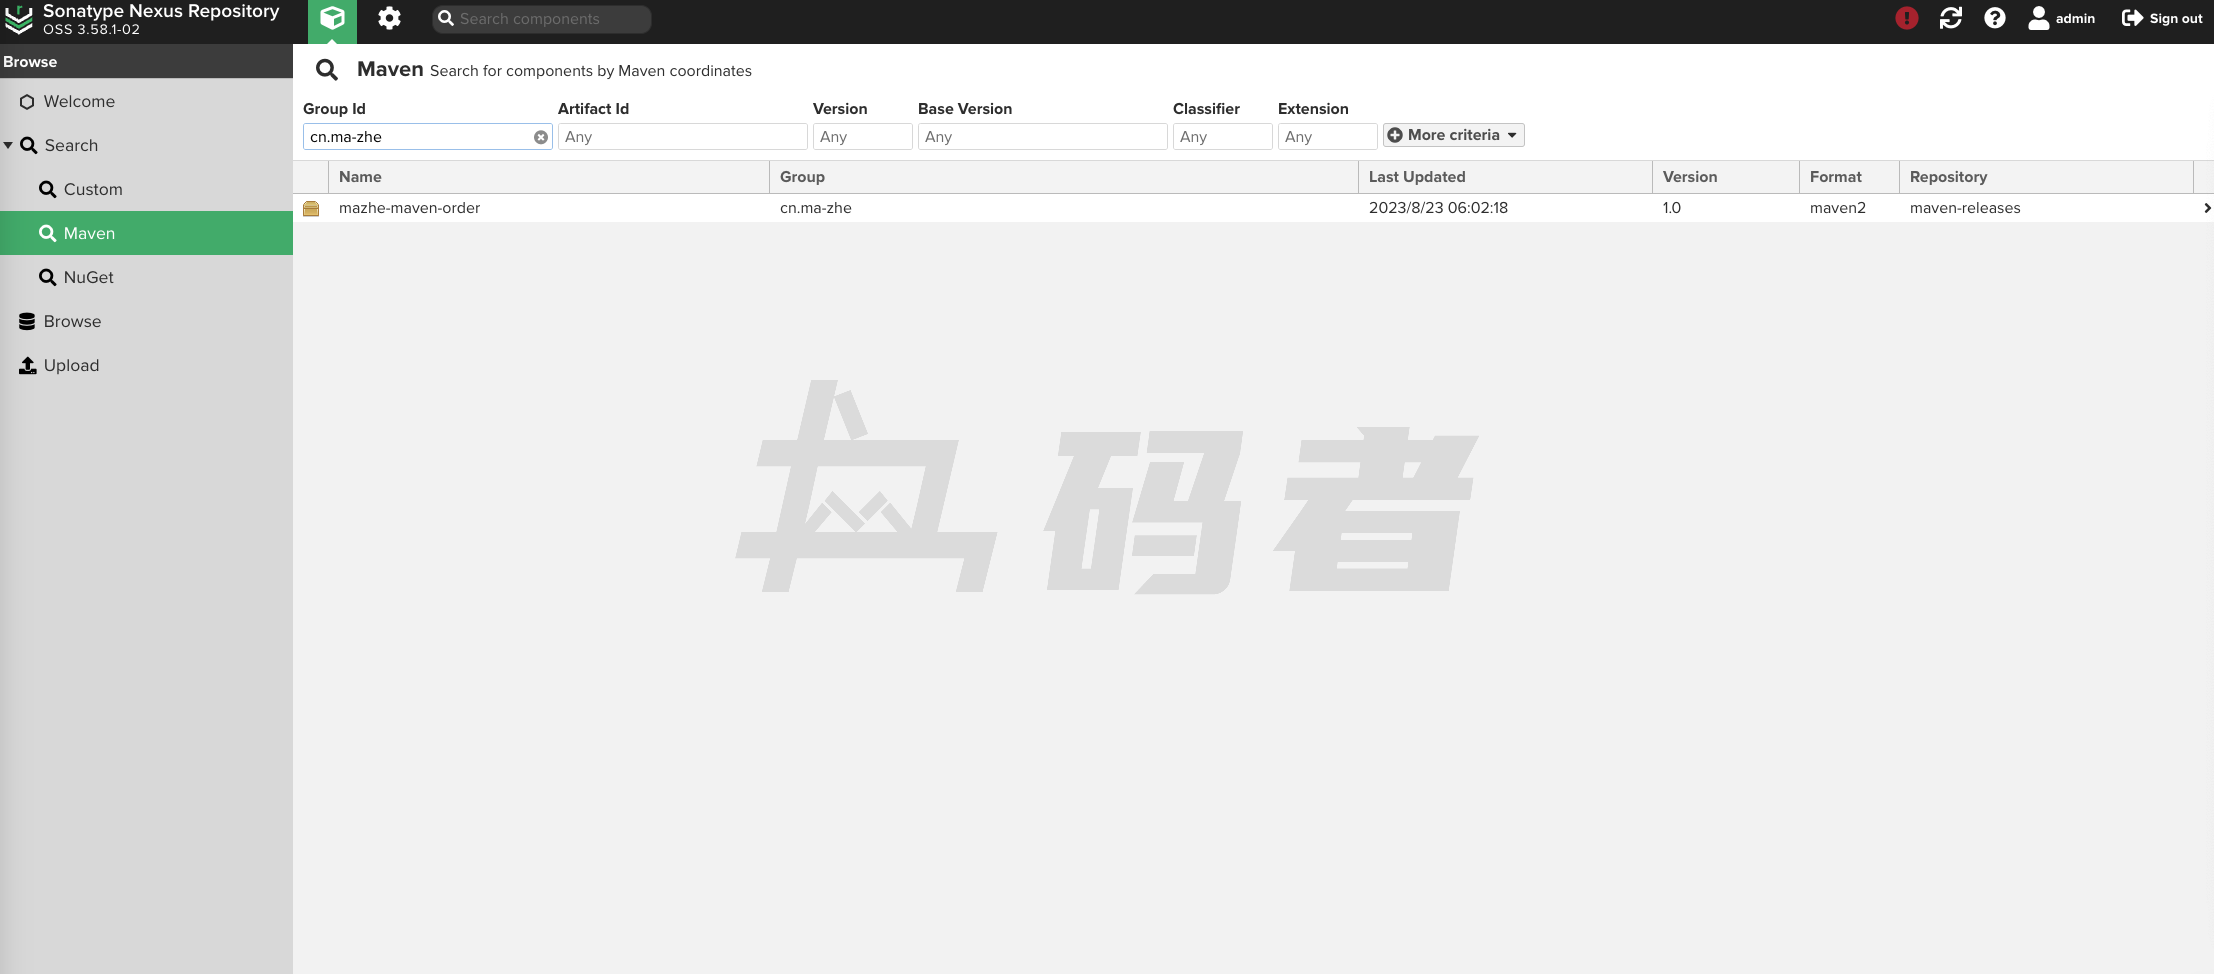
同样的依然会显示我们刚刚上传的依赖信息。这就是使用Nexus上传我们的依赖组件。下面我们介绍一下,上面的具体参数。
- File:需要上传的依赖包。
- Classifier:附属构建信息。
- Extension:依赖的组件类型。
- Group ID: 依赖的组件分组。
- Artifact ID:依赖的组件名称。
- Version: 依赖的组件版本。
- Generate a POM file with these coordinates:如果我们选择这个选项,依赖上传后则会生成该依赖的pom.xml文件。
- Packaging: 依赖的组件类型。
下面我们介绍一下如何通过Maven命令的方式上传依赖组件。
二、Maven中部署
既然是通过命令的方式上传,所以我们需要进行相应的配置,例如我们需要将依赖上传到Nexus中的哪个仓库中。这些都是需要我们在配置中指定,同样的我们还是在pom.xml中进行配置。具体的配置如下:
- pom.xml(mazhe-maven-order)
<?xml version="1.0" encoding="UTF-8"?>
<project xmlns="http://maven.apache.org/POM/4.0.0"
         xmlns:xsi="http://www.w3.org/2001/XMLSchema-instance"
         xsi:schemaLocation="http://maven.apache.org/POM/4.0.0 http://maven.apache.org/xsd/maven-4.0.0.xsd">
    <parent>
        <artifactId>midai-mazhe-maven</artifactId>
        <groupId>cn.ma-zhe</groupId>
        <version>1.0-SNAPSHOT</version>
    </parent>
    <modelVersion>4.0.0</modelVersion>

    <artifactId>mazhe-maven-order</artifactId>

    <distributionManagement>
        <repository>
            <id>maven-releases</id>
            <name>Releases Repository</name>
            <url>http://localhost:8081/repository/maven-releases</url>
        </repository>
    </distributionManagement>

</project>上面的配置为,我们要指定要上传的仓库的名称和地址。下面我介绍一下新命令,也就是Maven中提供的deploy命令。通过该命令,并且通过上面的配置,Maven会自动将依赖上传到我们配置的私服地址中。下面我们执行一下这个命令。
- 部署命令
mvn clean deploy- 部署日志
[INFO] ------------------------------------------------------------------------
[INFO] BUILD FAILURE
[INFO] ------------------------------------------------------------------------
[INFO] Total time:  2.954 s
[INFO] Finished at: 2023-08-24T06:04:40+08:00
[INFO] ------------------------------------------------------------------------
[ERROR] Failed to execute goal org.apache.maven.plugins:maven-deploy-plugin:3.1.1:deploy (default-deploy) on project mazhe-maven-order: Failed to deploy artifacts: Could not transfer artifact cn.ma-zhe:mazhe-maven-order:pom:1.0-20230823.220437-1 from/to maven-releases (http://localhost:8081/repository/maven-releases): status code: 401, reason phrase: Unauthorized (401) -> [Help 1]
[ERROR]
[ERROR] To see the full stack trace of the errors, re-run Maven with the -e switch.
[ERROR] Re-run Maven using the -X switch to enable full debug logging.
[ERROR]
[ERROR] For more information about the errors and possible solutions, please read the following articles:
[ERROR] [Help 1] http://cwiki.apache.org/confluence/display/MAVEN/MojoExecutionException我们看上面的日志,发现居然报错了,提示了我们401的错误,这是为什么呢?实际上也很简单。Nexus为了安全,在我们想要通过deploy命令上传依赖到Nexus的时候,必须配置相应的账号和密码,这也很容易理解,如果不这样设置,我们知道了任何一个仓库的地址,岂不是都可以上传自己的依赖包到这个仓库了吗,这样这个仓库就会有很多无用的依赖。下面我们配置一下Nexus的账号和密码,这一点和上面的配置不同,我们需要在Maven中的setting.xml文件中进行配置,账号和密码也就是我们直接访问Nexus中的账号和密码。具体的配置如下:
<settings>
    <servers>
        <server>
            <id>maven-releases</id>
            <username>admin</username>
            <password>jilinwula.com</password>
        </server>
    </servers>
</settings>
然后我们在次执行以下命令尝试将组件部署到Nexus中。
- 部署
mvn clean deploy- 日志
[INFO] BUILD FAILURE
[INFO] ------------------------------------------------------------------------
[INFO] Total time:  3.051 s
[INFO] Finished at: 2023-08-24T06:55:32+08:00
[INFO] ------------------------------------------------------------------------
[ERROR] Failed to execute goal org.apache.maven.plugins:maven-deploy-plugin:3.1.1:deploy (default-deploy) on project mazhe-maven-order: Failed to deploy artifacts: Could not transfer artifact cn.ma-zhe:mazhe-maven-order:pom:1.0-20230823.225529-1 from/to maven-releases (http://localhost:8081/repository/maven-releases/): status code: 400, reason phrase: Repository version policy: RELEASE does not allow version: 1.0-20230823.225529-1 (400) -> [Help 1]
[ERROR]
[ERROR] To see the full stack trace of the errors, re-run Maven with the -e switch.
[ERROR] Re-run Maven using the -X switch to enable full debug logging.
[ERROR]
[ERROR] For more information about the errors and possible solutions, please read the following articles:
[ERROR] [Help 1] http://cwiki.apache.org/confluence/display/MAVEN/MojoExecutionException我们看上面的日志还是报错了,但这次错误和之前有些不同,这次错误的原因则是仓库的策略和我们上传的版本不一致,因为该仓库只支持稳定版本的组件,但我们上传的是快照版本,所以上面的的部署报错了。下面我们修改一下mazhe-maven-order项目的版本。具体配置如下:
- pom.xml(mazhe-maven-order)
<?xml version="1.0" encoding="UTF-8"?>
<project xmlns="http://maven.apache.org/POM/4.0.0"
         xmlns:xsi="http://www.w3.org/2001/XMLSchema-instance"
         xsi:schemaLocation="http://maven.apache.org/POM/4.0.0 http://maven.apache.org/xsd/maven-4.0.0.xsd">
    <parent>
        <artifactId>midai-mazhe-maven</artifactId>
        <groupId>cn.ma-zhe</groupId>
        <version>1.0</version>
    </parent>
    <modelVersion>4.0.0</modelVersion>

    <artifactId>mazhe-maven-order</artifactId>

    <distributionManagement>
        <repository>
            <id>maven-releases</id>
            <name>maven-releases</name>
            <url>http://localhost:8081/repository/maven-releases/</url>
        </repository>
    </distributionManagement>
</project>
然后我们继续执行部署的命令。
- 部署
mvn clean deploy- 日志
[INFO] BUILD FAILURE
[INFO] ------------------------------------------------------------------------
[INFO] Total time:  3.581 s
[INFO] Finished at: 2023-08-24T07:05:21+08:00
[INFO] ------------------------------------------------------------------------
[ERROR] Failed to execute goal org.apache.maven.plugins:maven-deploy-plugin:3.1.1:deploy (default-deploy) on project mazhe-maven-order: Failed to deploy artifacts: Could not transfer artifact cn.ma-zhe:mazhe-maven-order:jar:1.0 from/to maven-releases (http://localhost:8081/repository/maven-releases/): status code: 400, reason phrase: Repository does not allow updating assets: maven-releases (400) -> [Help 1]
[ERROR]
[ERROR] To see the full stack trace of the errors, re-run Maven with the -e switch.
[ERROR] Re-run Maven using the -X switch to enable full debug logging.
[ERROR]
[ERROR] For more information about the errors and possible solutions, please read the following articles:
[ERROR] [Help 1] http://cwiki.apache.org/confluence/display/MAVEN/MojoExecutionException看日志居然又报错了,并且错误又和上面的不一样了。这个错误的原因是该仓库不允许重新部署,我们在上一篇中介绍过,在创建仓库时是可以设置仓库的部署策略的。也就是Deployment policy参数。
该参数的具体配置如下:
1、Disable redeploy:禁用重新部署
2、Allow redeploy:允许重新部署
3、Read-only:只读
4、Deploy by Replication Only:仅通过复制部署
下面我们修改一下这个仓库的配置。因为上一篇中我们已经介绍过了。所以这里就不在重复介绍了。
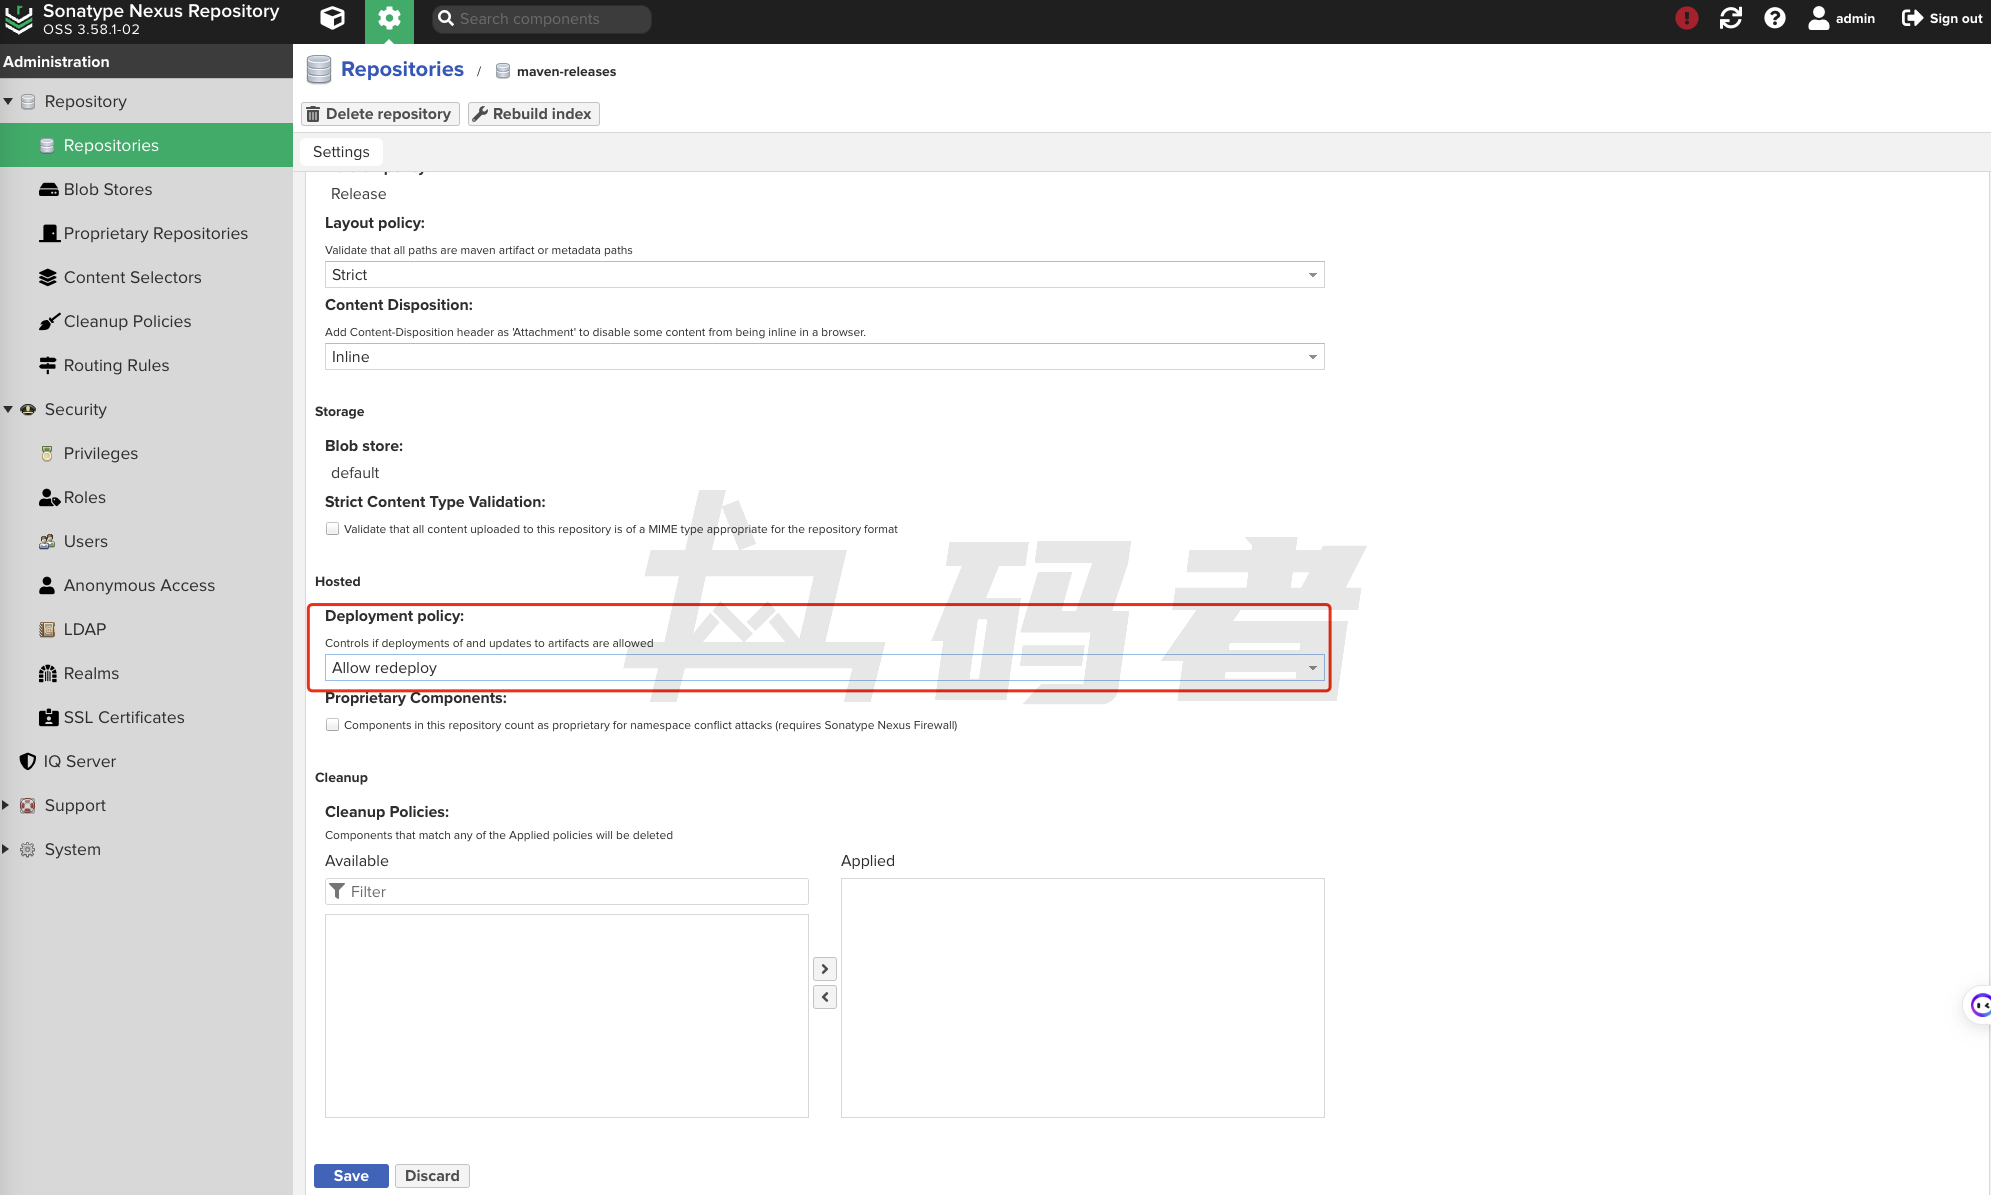
修改完成后,我们在次执行上面的部署命令。
- 部署
mvn clean deploy- 日志
[INFO]
[INFO] --- deploy:3.1.1:deploy (default-deploy) @ mazhe-maven-order ---
Uploading to maven-releases: http://localhost:8081/repository/maven-releases/cn/ma-zhe/mazhe-maven-order/1.0/mazhe-maven-order-1.0.pom
Uploaded to maven-releases: http://localhost:8081/repository/maven-releases/cn/ma-zhe/mazhe-maven-order/1.0/mazhe-maven-order-1.0.pom (757 B at 3.2 kB/s)
Uploading to maven-releases: http://localhost:8081/repository/maven-releases/cn/ma-zhe/mazhe-maven-order/1.0/mazhe-maven-order-1.0.jar
Uploaded to maven-releases: http://localhost:8081/repository/maven-releases/cn/ma-zhe/mazhe-maven-order/1.0/mazhe-maven-order-1.0.jar (1.9 kB at 13 kB/s)
Downloading from maven-releases: http://localhost:8081/repository/maven-releases/cn/ma-zhe/mazhe-maven-order/maven-metadata.xml
Downloaded from maven-releases: http://localhost:8081/repository/maven-releases/cn/ma-zhe/mazhe-maven-order/maven-metadata.xml (377 B at 5.5 kB/s)
Uploading to maven-releases: http://localhost:8081/repository/maven-releases/cn/ma-zhe/mazhe-maven-order/maven-metadata.xml
Uploaded to maven-releases: http://localhost:8081/repository/maven-releases/cn/ma-zhe/mazhe-maven-order/maven-metadata.xml (356 B at 3.2 kB/s)
[INFO] ------------------------------------------------------------------------
[INFO] BUILD SUCCESS
[INFO] ------------------------------------------------------------------------
[INFO] Total time:  3.445 s
[INFO] Finished at: 2023-08-24T07:21:07+08:00
[INFO] ------------------------------------------------------------------------
我们看上面的日志,这次我们部署成功了,下面我们通过Nexus中查看一下,我们使用命令部署的组件。
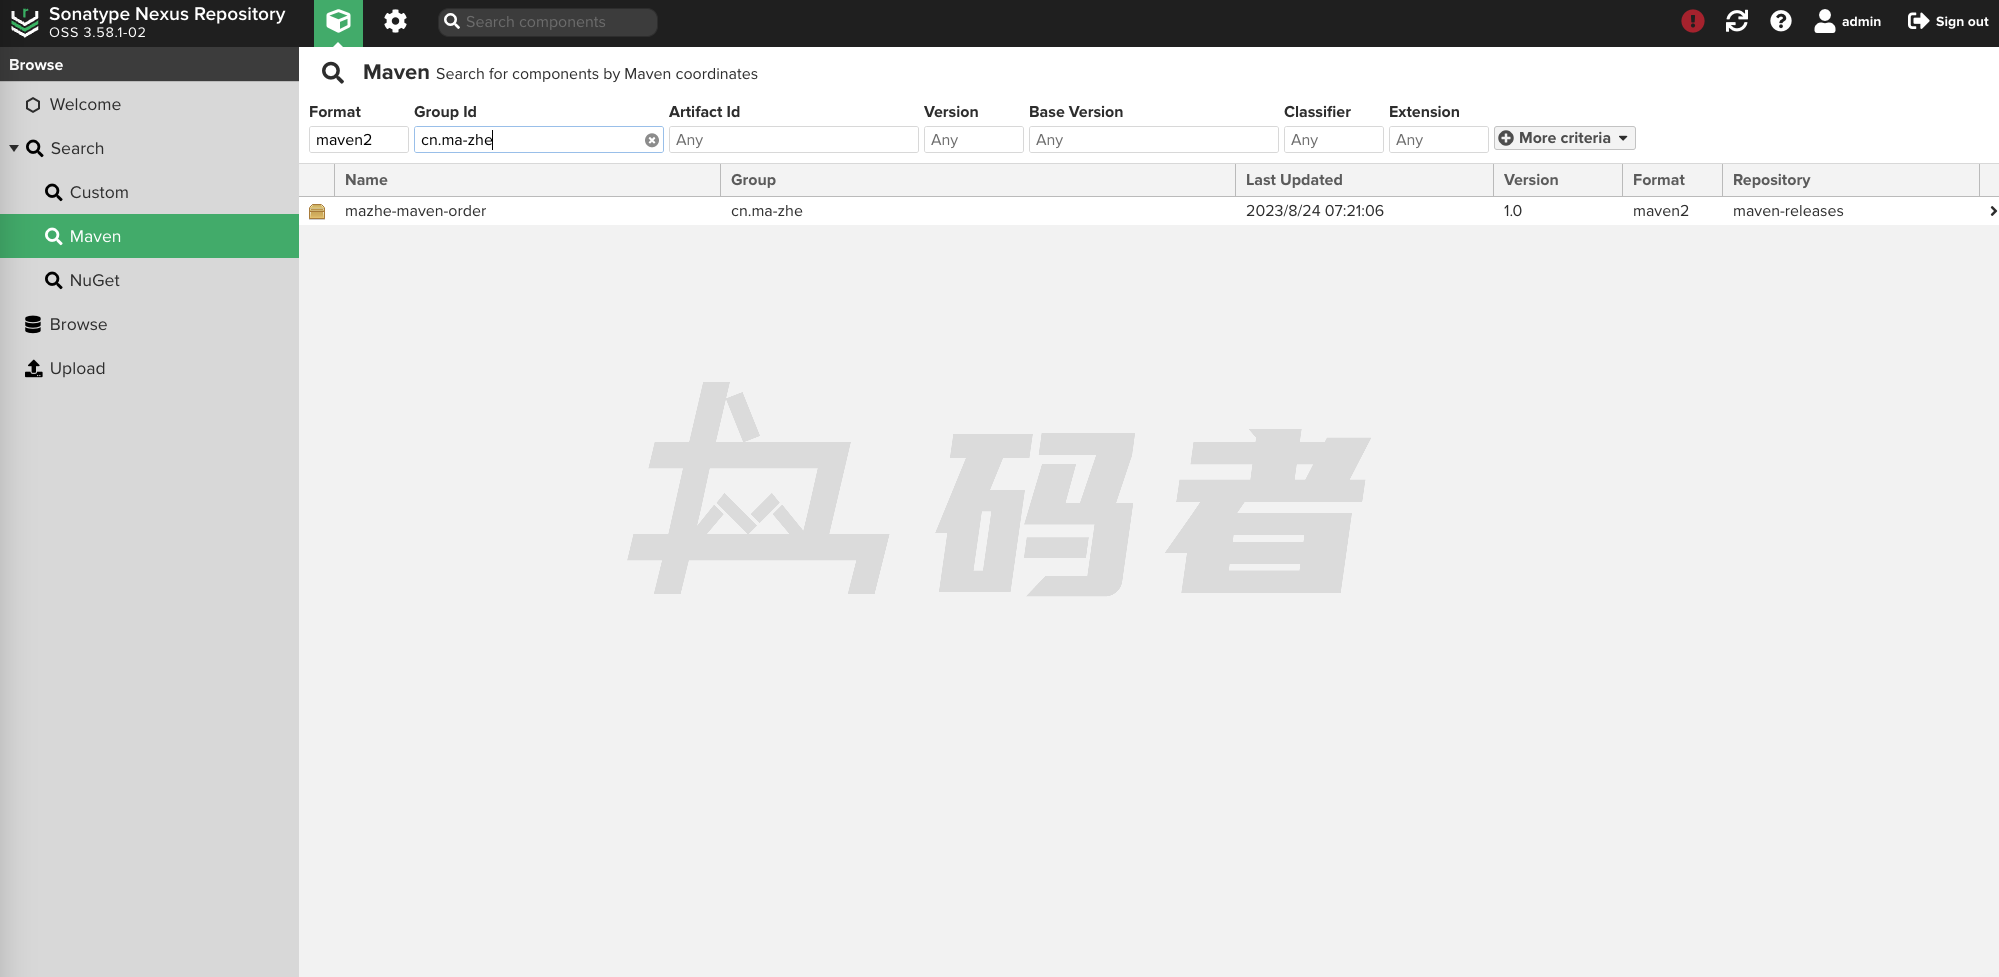
这样我们就完成了通过命令部署组件到Nexus了。
三、如何使用Nexus中的组件
下面我们介绍一下如何使用Nexus中的组件,因为我们已经将mazhe-maven-order组件成功的上传的到了Nexus中,所以我们直接在另外的一个项目中引入这个依赖看是否能够成功的下载。有一点要注意,我们需要将本地仓库的中的mazhe-maven-order组件删除掉。因为按照之前我们介绍过的内容,Maven在下载组件时,会先在本地仓库中去寻找,如果没有找到才会去私服或者中央仓库中去寻找,如果我们不将本地仓库的依赖删除掉,Maven是不会从我们Nexus中去下载组件的。下面我们已项目mazhe-maven-mall为例子,在这个项目中添加mazhe-maven-order组件。具体配置如下:
- pom.xml(mazhe-maven-mall)
<?xml version="1.0" encoding="UTF-8"?>
<project xmlns="http://maven.apache.org/POM/4.0.0"
         xmlns:xsi="http://www.w3.org/2001/XMLSchema-instance"
         xsi:schemaLocation="http://maven.apache.org/POM/4.0.0 http://maven.apache.org/xsd/maven-4.0.0.xsd">
    <groupId>cn.ma-zhe</groupId>
    <version>1.0</version>
    <modelVersion>4.0.0</modelVersion>

    <artifactId>mazhe-maven-mall</artifactId>

    <dependencies>
        <dependency>
            <groupId>cn.ma-zhe</groupId>
            <artifactId>mazhe-maven-order</artifactId>
            <version>1.0</version>
        </dependency>
    </dependencies>
</project>
然后我们编译项目看一下日志输出。
- 编译
mvn clean package- 日志
[INFO] BUILD FAILURE
[INFO] ------------------------------------------------------------------------
[INFO] Total time:  0.479 s
[INFO] Finished at: 2023-08-24T19:22:34+08:00
[INFO] ------------------------------------------------------------------------
[ERROR] Failed to execute goal on project mazhe-maven-mall: Could not resolve dependencies for project cn.ma-zhe:mazhe-maven-mall:jar:1.0: Failure to find cn.ma-zhe:mazhe-maven-order:jar:1.0 in https://repo.maven.apache.org/maven2 was cached in the local repository, resolution will not be reattempted until the update interval of central has elapsed or updates are forced -> [Help 1]
[ERROR]
[ERROR] To see the full stack trace of the errors, re-run Maven with the -e switch.
[ERROR] Re-run Maven using the -X switch to enable full debug logging.
[ERROR]
[ERROR] For more information about the errors and possible solutions, please read the following articles:
[ERROR] [Help 1] http://cwiki.apache.org/confluence/display/MAVEN/DependencyResolutionException
我们看上面的日志输出,提示我们组件下载失败了,并且通过日志我们也发现Maven是在中央仓库中寻找我们的依赖组件。但这个组件是我们上传到私服中的组件,所以中央仓库中查询不到报错了。所以我们需要配置一下私服的地址,也就是告诉Maven去私服中去查询我们的组件。下面是具体的配置。
- settings.xml
<profiles>
    <profile>
          <id>mazhe</id>
          <repositories>
              <repository>
                <id>maven-releases</id>
                <url>http://localhost:8081/repository/maven-releases/</url>
                <releases>
                    <enabled>true</enabled>
                    <updatePolicy>daily</updatePolicy>
                </releases>
            </repository>
          </repositories>
    </profile>
</profiles>
<activeProfiles>
    <activeProfile>mazhe</activeProfile>
</activeProfiles>
然后我们在次执行一下上面的编译命令。
- 编译
mvn clean package- 日志
[INFO] Scanning for projects...
[INFO]
[INFO] ---------------------< cn.ma-zhe:mazhe-maven-mall >---------------------
[INFO] Building mazhe-maven-mall 1.0
[INFO] --------------------------------[ jar ]---------------------------------
Downloading from maven-releases: http://localhost:8081/repository/maven-releases/cn/ma-zhe/mazhe-maven-order/1.0/mazhe-maven-order-1.0.pom
Downloaded from maven-releases: http://localhost:8081/repository/maven-releases/cn/ma-zhe/mazhe-maven-order/1.0/mazhe-maven-order-1.0.pom (674 B at 1.4 kB/s)
Downloading from maven-releases: http://localhost:8081/repository/maven-releases/cn/ma-zhe/mazhe-maven-order/1.0/mazhe-maven-order-1.0.jar
Downloaded from maven-releases: http://localhost:8081/repository/maven-releases/cn/ma-zhe/mazhe-maven-order/1.0/mazhe-maven-order-1.0.jar (2.0 kB at 39 kB/s)
[INFO]
[INFO] --- maven-jar-plugin:2.4:jar (default-jar) @ mazhe-maven-mall ---
[INFO] Building jar: /Users/essfzqbghl/Documents/midai-mazhe-maven/mazhe-maven-mall/target/mazhe-maven-mall-1.0.jar
[INFO] ------------------------------------------------------------------------
[INFO] BUILD SUCCESS
[INFO] ------------------------------------------------------------------------
[INFO] Total time:  4.896 s
[INFO] Finished at: 2023-08-24T19:55:07+08:00
[INFO] ------------------------------------------------------------------------
我们看这回日志执行成功了,并且通过上面的日志我们也看到了,Maven是从我们配置的Nexus中的私服中下载的依赖。以上内容这就是如何使用Nexus下载我们指定的依赖。
